Showing posts with label crafts. Show all posts

Monday, 4 February 2013

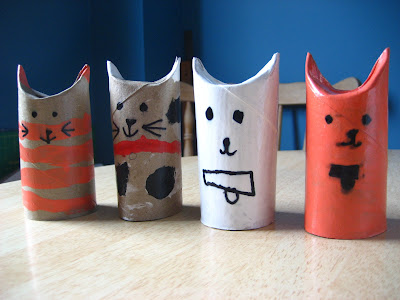
Take a few toilet rolls....


...an idea from Pinterest and you get a lovely day of crafting with the kids.


It's been so long since we all crafted together and we all enjoyed this idea.
Squash down some ear shapes, paint and add faces and hey presto, we have a family of cats and dogs for our family!


You can find loads of great ideas, not just things to do with the kids, on Pinterest, find me HERE

Wednesday, 28 November 2012

More making!

Being back at work three days a week is seriously affecting my crafty mojo,
evenings are currently spent in a vegetative state after putting the kids to bed!

But I did make things a while ago......


Here is Rowan's mobile, not finished until she was about 6mths old, but hey!


This little mouse from Mollie Makes was very fiddly but my Mum liked it!


I jazzed up some cheap Ikea towels (20p each) with free ribbon from Mollie Makes!


and Rowan's nearly growing out of these but they're super comfy, the colours aren't great but they were made out of a red t-shirt and a blue sweatshirt both from the charity shop.  The pattern is Bubble Pants by Meg McElwee's Growing up Sew Liberated and is fantastic for cloth nappy big butt babies!

I'm trying to plan some Christmas crafting and some ideas for the kids to do, come and see on Pinterest!
I'd love to see what other people are up to....


Oh and it's The Vintage & Handmade Fair on Saturday, Chipping Sodbury.
I have a few pennies to spend and am really looking forward to some child free hours!

Tuesday, 4 October 2011

Nursing Cover

I wanted to quickly share a new make from this week in case it's of use for anyone else.  I found this link to a DIY nursing cover last week and it was so timely it was spooky as I had a bid in on eBay for a Bebe au Lait nursing cover - these retail for about £25 on Amazon and even on eBay they go for at least £12-£18.
When I saw the tutorial on DIY Maternity I was amazed I hadn't thought to make one as it is really just a rectangle of fabric with a neck strap!

I used some Ikea fabric I had in my stash, which is nice and light, you don't want the baby to get too hot under there!
Now you can use proper plastic boning but that would have meant spending money so as the tutorial author tries I went for the budget DIY version, I took a plastic tub (M&S chocolate crispy treats!) and I tried using the lid lip but it wouldn't bend enough, so I just cut a length from the main body of the tub instead.  It's a bit more flimsy but holds the arc shape, so we'll see how it holds up.

 
I had to fit making it into the baby's nap times, so it took me a day (!) but in real life it's a real simple 1-2hr job and I would definitely recommend making one in pregnancy just in case you need it.

Now it should give me the confidence to breastfeed wherever I need to, as it's only been with this baby that I've got to week 2 and felt ok about breastfeeding. With the other two I never enjoyed it and got on much better with bottle-feeding, so the whole having to breastfeed in public is never something I've had to do before, so I am a little apprehensive but with my new cover I should have no problems, apart from finding a place/seat to actually do it in town now!

Tuesday, 9 August 2011

Plastic Bunting

Last week provided an end to the 'heatwave' and brought a very welcome (for me!) rainy day!
I was actually looking forward to this as I had a project ready & waiting, the lovely Original Stitch had mentioned on her twitter feed about a recycling project to do with the kids: http://originalstitch.blogspot.com/2010/06/eco-tip-1-party-bunting-and-wood.html

The original tutorial was from Amelia's Magazine, which is very instructive.

 Basically you need to cut up some plastic bags, sandwich them between greaseproof paper and iron to create a thicker plastic material.

It's a case of trial and error, I've found that some of the ink's tend to get sticky and stick to the paper, so it's best to sandwich them with clearer plastic bags over the top.

The cheap supermarket bags need to be layered as they tend to get holes in if they're too thin.

It's best if you have nice carrier bags!

I got too hot doing the ironing but would have liked to spent longer making better collages with the prints or putting sequins/threads in the layers!

Iron lightly on each side and then leave for about 10 seconds, with some bags you'll hear the plastic crackling as it cools down and then it's easier to peel the paper away.


Once the grown-up job was done (and you could of course do it in advance if you're one of those organised mummy's!) it was time for the production line!

Cue music to work too, lots of drawing round a triangle template and then lots of scissor cutting out action! 
My girls loved this as we used 'grown-up' scissors as their kiddy ones weren't really up to the job.


Next job was to put holes in the top corners, my hole-punch didn't like it so instead we went all Blue Peter and used kebab sticks with blue-tack under the flags.

After hunting out the garden twine from the shed (in the pouring rain) both my youngest and me set about threading them up.  The Eldest had got bored by now and was back to her usual 'nose in a book' position!  I thought this would be too tedious for the 5 yo but she loved it and did great, by the time we'd finished the sun had come out so we were able to hang it out to see the fruits of our labours.


It's not the most prettiest or well designed but as a lovely project that we all did together I'm more than happy with it.  It also really cheers up the ugly wooden fence!

Friday, 5 August 2011

July Round-Up

Well July didn't seem to hang around long, so I'll have a round-up of several things I didn't get round to blogging about!
First up, Witney Carnival, our annual summer fair with lots of entertainment and a general good community feeling.  Like most of July it was a case of sunshine & showers but it really didn't spoil the day, my favourite Mr Alexander was there to delight & entertain, his little show never fails to make me smile, if he's touring around your way you must make an effort to see him!


July also means End Of School!  Which although everyone looks forward to, actually means...Teachers Gifts!!  Eek, this year I did so want to do something handmade and personal, but as always I never give myself enough time, so the fabric coaster or fabric apple ideas were soon shelved!  Then I remembered the fab tutorial from The MadHouse that I'd bookmarked for last Christmas...tea-cup candles!
They looked fairly simple and quick but could I find any tea-cups at any of the charity shops?!  You can tell that nice tea-cups are popular, you used to trip over them all the time, but now nothing around my neck of the woods!  So instead I went for bowls and one nice glass which I think must originally had a candle in already.
As recommended I visited Whicks n' Whacks for the candle making supplies, which had all I needed and had a fast courier delivery option!

I got 1kg of Ecosoya CB Advanced Container Blend, 

25 Prewaxed Tabbed Wedo LX Votive Candle Wick - Wedo LX14 - 65mm (guessed at the large size as the bowls were quite wide)

Bottle of Fresh Cut Roses Fragrance Oil


Following both 'The MadHouse' instructions and also the helpful hints of Whicks n' Whacks, I measured out roughly how much wax I would need to melt for the 6 containers - which actually turned out to be rather a lot,  I had to do it in two batches!
Basically all you need to do is melt the wax in the microwave, when cool add the fragrance - not too much, think it's best to err on the side of caution, I found doing just 6 candles the smell was quite over-powering!
Stick the wicks to the bottom of the containers, I wedged mine in with a bit of warm wax and then pour in the melted & cooled wax.
Easy!
I kept checking on the wicks to make sure they weren't drooping while the wax was hardening but by the evening/next morning they were ready to be wrapped and given out!


I would definitely recommend this as an easy present, I have lots of the supplies left so I can just vary the fragrance for different people/occasions.
I'll continue the round-up in a new post, as it's 'Art in Action' and I have a lot of photos!

Tuesday, 28 October 2008

Getting ready for Halloween

Bats and black paint, this year as I'm home more at the moment I thought we'd make more of an effort to have fun at Halloween, so I donwloaded a free bat template, cut them out of cereal boxes and got the kiddlies to paint! Kira ended up painting her hands and arms black, she looked like a coal miner!! Aeryn decorated her Halloween costume, which she decided is going to be a robot (!), so lots of gluing with foil.


And then off to the park for a pre-dinner play, then home for sausages for tea oh and a Dora episode!

Thursday, 18 September 2008

Unfinshed Projects


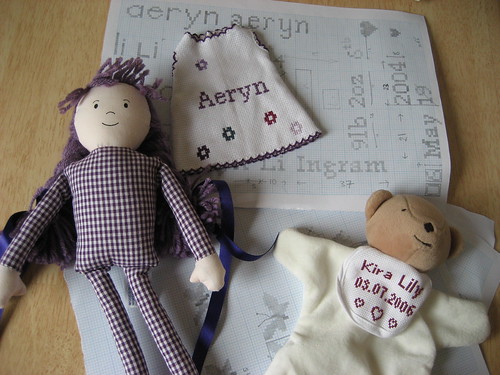
IMG_0335, originally uploaded by blackdoganna.

I don't know about you but I seem to have unfinished projects squirreled away, mostly all cross stitch. After the initial excitement has worn off, all longish projects seem to go through a 'quiet' period and once it's been put down I find it hard to make myself pick it up and finish it again.


I did a birth sampler for my first daughter, started it during pregnancy......and finished it when she was two!! I haven't even got daughter #2's out of the wrapper!
So I think I need to tackle this and also make this blog work for me, so I'm going to post pictures of all unfinished projects to shame me! I think I might also give myself a little incentive too, a metre of new fabric for every one finished?! (I'm desperate to get a fabric stash going, but it all seems so expensive and I can't justify the out-lay for no good reason when money's tight!)


So this is the first one I've uncovered, a rag doll that needs the dress finishing with a design on the back and the teddy that needs just one more colour to inject a bit of interest, these will then be Christmas presents as I intended them to be in 2006! I'll keep progress updated and also dig out the other projects that are lurking....!